Difference between revisions of "LED sleeve"
m (added my tube experience (I recommend a ground plug+reduced tube for easy travel and installation)) |
(Sleeve++!) |
||
| (2 intermediate revisions by the same user not shown) | |||
| Line 5: | Line 5: | ||
|Description=ART-net controlled cylindrical-ish display | |Description=ART-net controlled cylindrical-ish display | ||
}} | }} | ||
| − | + | {{#Widget:Html5media|url={{filepath:sleevePoE.webm}}}} | |
| + | |||
| + | Artistic impression on how the (new) sleeve works. | ||
| − | + | == synopsis == | |
| − | LED sleeve, also known as | + | LED sleeve, also known as OHM2013 torch is a project [[User:Xopr|xopr]] wanted to do a long time, so at one blue Monday in the summer of 2020, he decided to just build one (two actually), a [[Micro sleeve]] in May 2024 and a PoE Sleeve++ in September 2024. |
| − | I didn't want to take the trouble to order descent PCBs so | + | I didn't want to take the trouble to order descent PCBs so everything is piggybacked and hotwired. |
| + | == first version == | ||
| + | [[Image:LEDsleeve.gif]] | ||
| + | I piggybacked an ENC28J60 module to an Arduino pro mini (that's all there is to, actually). | ||
=== build === | === build === | ||
| Line 55: | Line 60: | ||
Some important notes: | Some important notes: | ||
| − | * | + | * the correct winding is top to bottom, clockwise (seen from the top, i.e.: from top right to bottom left) |
| − | * I had old Arduino pro minis with old bootloaders | + | * I had old Arduino pro minis with old/wrong bootloaders: for these kinds, select Arduino Uno to be able to upload any sketch |
| − | * | + | * make sure you don't use other diameter pipes (like 75mm drain pipes) or your image will be garbled |
* to solder the headers on the solder side, you have to offset them from the PCB (I used scrap plastic from zip ties) | * to solder the headers on the solder side, you have to offset them from the PCB (I used scrap plastic from zip ties) | ||
* the power supplies on ebay are '''very dubious!''' They are refurbished (sloppy) and given the wire gauge I strongly doubt the were built for 8A continuous use. Don't leave them unattended | * the power supplies on ebay are '''very dubious!''' They are refurbished (sloppy) and given the wire gauge I strongly doubt the were built for 8A continuous use. Don't leave them unattended | ||
| Line 63: | Line 68: | ||
* the Arduino libraries can be a pain to find and/or get working. YMMV. | * the Arduino libraries can be a pain to find and/or get working. YMMV. | ||
* for added safety, crimp your stranded wires; it's not worth risking fire for a couple of cents extra | * for added safety, crimp your stranded wires; it's not worth risking fire for a couple of cents extra | ||
| + | * regarding the firmware<ref>[https://github.com/bobo1on1/loc_controller controller firmware]</ref>, make sure to install these specific library versions (and no higher as these are the last working versions for this project): | ||
| + | ** EtherCard 1.0.0<ref>https://github.com/njh/EtherCard/releases/tag/1.0.0</ref> | ||
| + | ** FastLED 3.3.2<ref>https://github.com/FastLED/FastLED/releases/tag/3.3.2</ref><ref>https://fastled.io/</ref> | ||
| + | |||
| + | == sleeve++ == | ||
| + | This version uses a PoE++ injector and a PoE+ splitter to have less cable clutter and make life easier. | ||
| + | |||
| + | It also switches from a cheap Arduino pro mini, ethernet and perf board "glue" to an Arduino Nano clone; the LGT8F328P-LQFP32 MiniEVB, and an ethernet board that fits this footprint. The LEDstrip is 12V this time and the AVR clone came with its own challenges, but nothing major. | ||
| + | |||
| + | === notes === | ||
| + | * The Ethercard library had to be modified to use the Arduino SPI methods (so SPI initialization is done correctly on the LGT8Fx) | ||
| + | * I fried an ethernet controller by putting 12V on the Arduino Vin pin; the Arduino itself was able to handle it, although it became very hot, so I switched to a buck converter to be on the safe side. | ||
| + | * All LEDS on will draw approximately 1.688A (at 12V) | ||
| + | * Originally, I had a PoE++ 7.5A extractor, but it doesn't fit in the 70mm tube; I was thinking on buying an adaptor but I tried small extractors first: | ||
| + | ** LS-POE-1210GK: jumped into protection at 1A | ||
| + | ** LS-POE-1210E, the 24-48V version also jumped into protection at 1A | ||
| + | ** LS-POE-1210DK: success using approximately 1.5A, but seemed to have some glitches | ||
| + | |||
| + | === todo === | ||
| + | * share ethercard changes | ||
| + | * moar pictures | ||
| − | + | == also see == | |
| − | * [https://bitlair.nl/Projects/Ohm_led_strip_sleeves Ohm led strip sleeves on Bitlair] | + | <references /> |
| − | * [https://tkkrlab.nl/wiki/OHM_LEDS | + | ** [https://bitlair.nl/Projects/Ohm_led_strip_sleeves Ohm led strip sleeves on Bitlair] |
| − | * [https://eventinfra.org/ EventInfra (they loan these sleeves and have 90+ of them)] | + | ** [https://wiki.tkkrlab.nl/tkkrlab.nl/wiki/OHM_LEDS.html on TkkrLab] |
| − | * | + | ** [https://eventinfra.org/ EventInfra (they loan these sleeves and have 90+ of them)] |
| − | * [https://github.com/AlbertVos/bitlair-ohm2013-ledstrip-contol bitlair-ohm2013-ledstrip-contol] | + | ** [https://github.com/AlbertVos/bitlair-ohm2013-ledstrip-contol bitlair-ohm2013-ledstrip-contol] |
| − | * [https://bitlair.nl/Projects/ledcat new ledcat control software] and its [https://github.com/polyfloyd/ledcat github page] | + | ** [https://bitlair.nl/Projects/ledcat new ledcat control software] and its [https://github.com/polyfloyd/ledcat github page] |
| + | ** [[Micro sleeve]] | ||
Latest revision as of 15:45, 16 September 2024
| Project: LED sleeve | |
|---|---|
| Featured: | No |
| State | Completed |
| Members | Xopr |
| GitHub | No GitHub project defined. Add your project here. |
| Description | ART-net controlled cylindrical-ish display |
| Picture | |
| No project picture! Fill in form Picture or Upload a jpeg here | |
Artistic impression on how the (new) sleeve works.
synopsis
LED sleeve, also known as OHM2013 torch is a project xopr wanted to do a long time, so at one blue Monday in the summer of 2020, he decided to just build one (two actually), a Micro sleeve in May 2024 and a PoE Sleeve++ in September 2024.
I didn't want to take the trouble to order descent PCBs so everything is piggybacked and hotwired.
first version
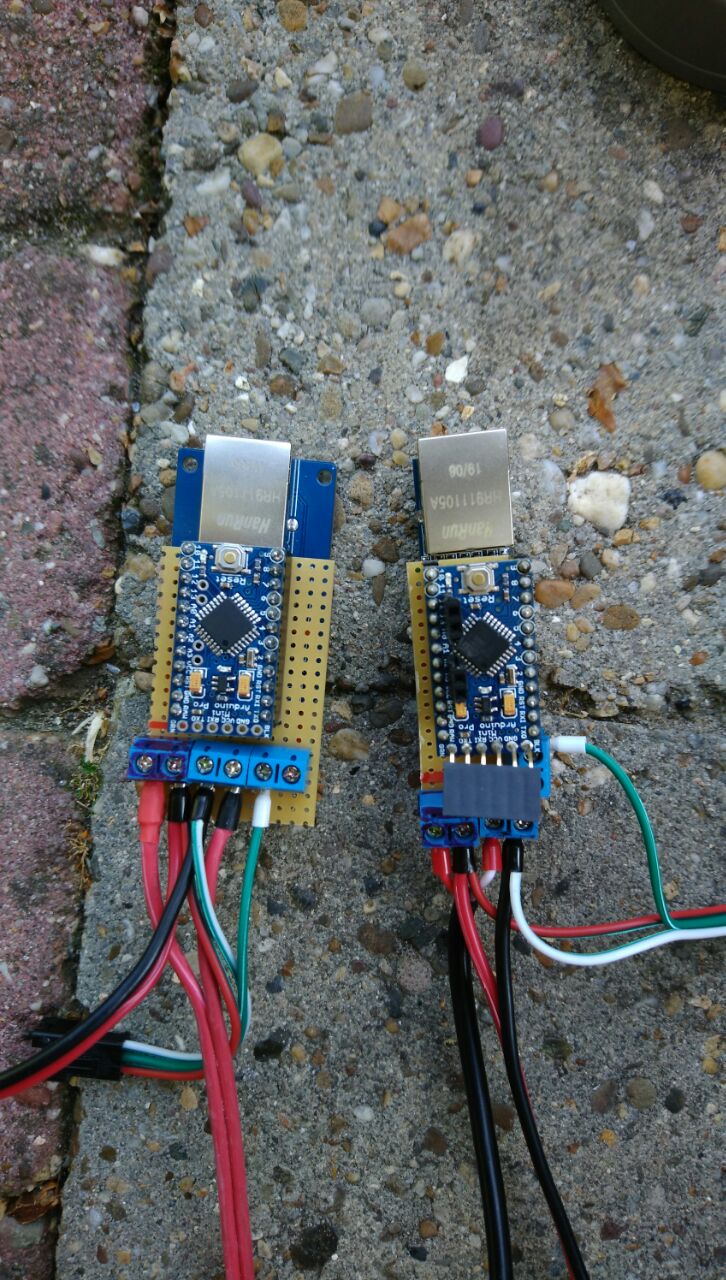
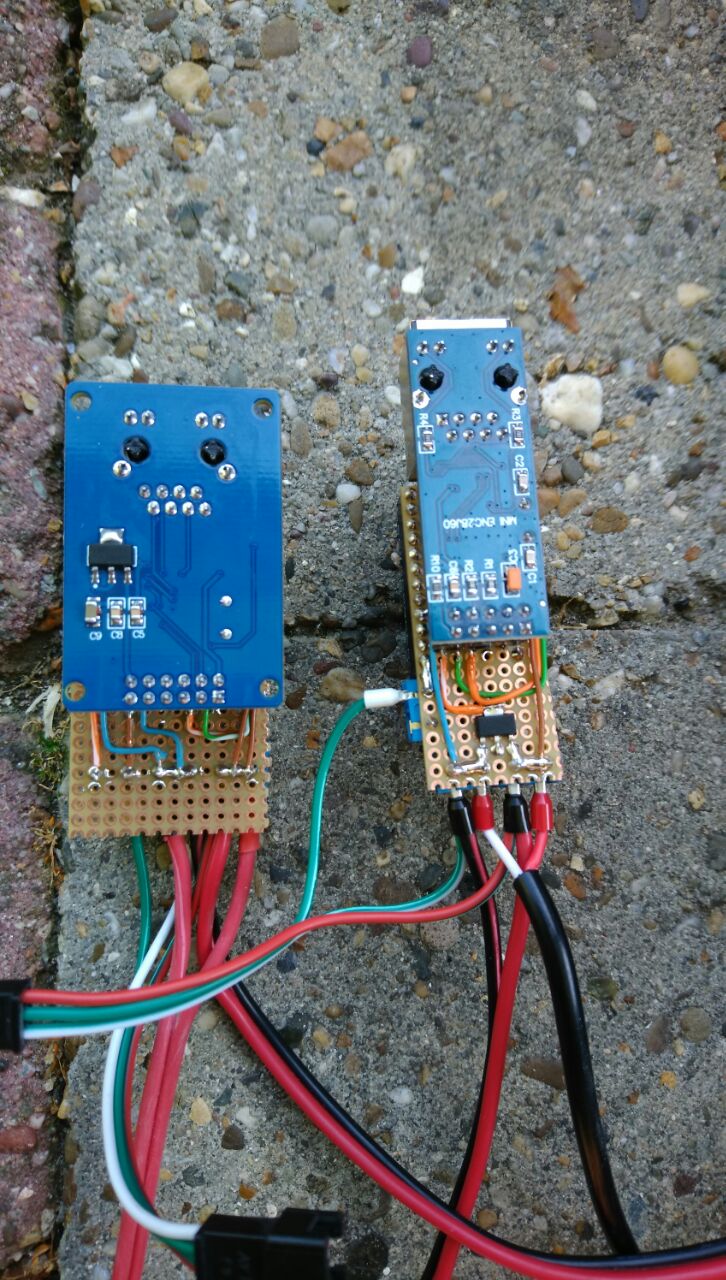
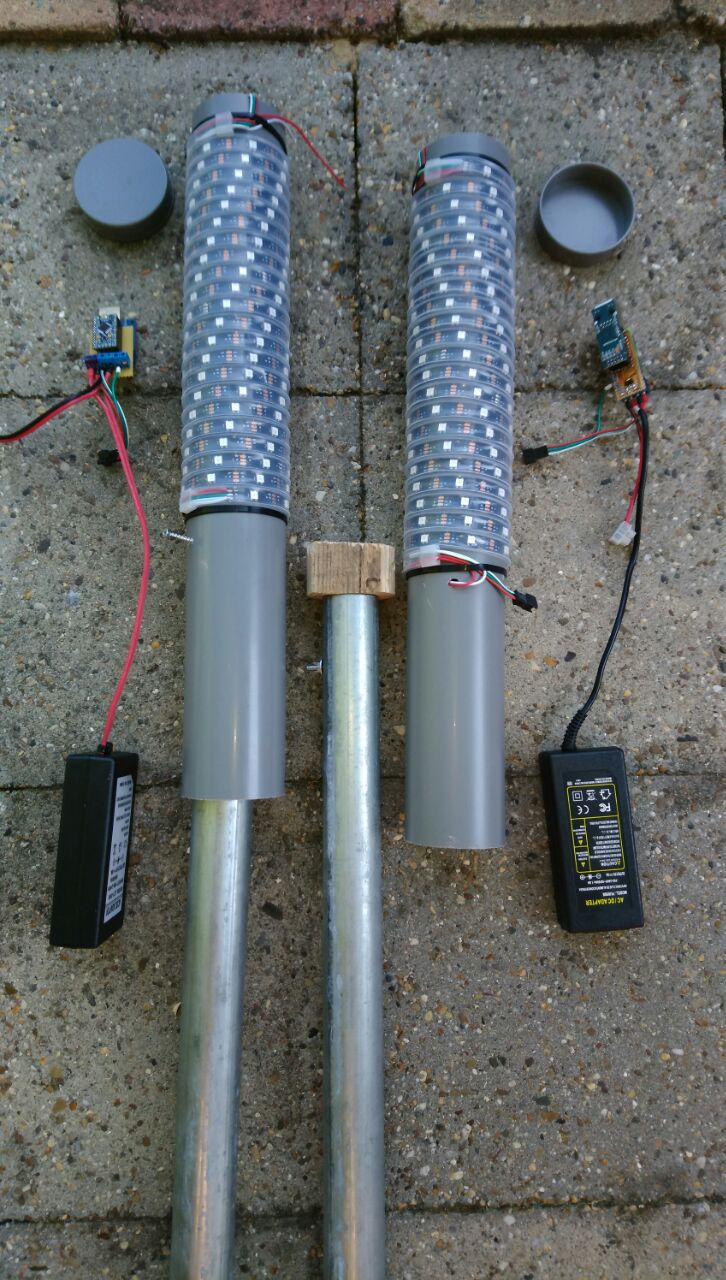
 I piggybacked an ENC28J60 module to an Arduino pro mini (that's all there is to, actually).
build
The list you need to build one:
- 1 Ledstrip WS2812 5m30L/m
- 1 Arduino pro mini (5V)
- 1 ENC28J60 or ENC28J60 mini with a separate LM1117 regulator
- 1 power supply 5V8A (laptop PSU form factor)
- 1 prototype PCB 13x16 or 8x20 holes (wide v.s. narrow/mini)
- 3x2 screw terminals
- 1 header 2x6/2x5 (for ENC28J60 regular v.s. mini)
- 33cm rainwater drainage (HWA or "hemelwaterafvoer") tube 70mm
- 1 lid 70mm
- 4 wire crimp terminal 1.5mm (recommended)
- 1 or 2 wire crimp terminal 0.5mm or 0.75mm (recommended)
- 0.4m cable 2x0.75mm
- 1 wooden base ~70mm diameter
- 2 large zip ties (to fix the LED strip)
- 3 or 4 wood screws (for the base)
- 1 network cable
- 1 power cable
- 10cm shrink wrap (recommended)
- 2/12th paired screw terminals (recommended)
- 1/4th thick broom stick with a large screw (optional)
- either
- flag pole holder (optional)
- or ground screw with 2m tube (optional; xopr used 3 reduced/verjongde 64cm tube coming off a trampoline)
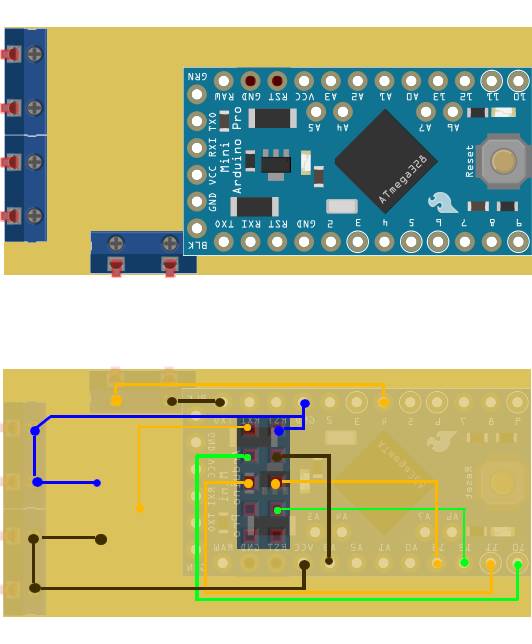
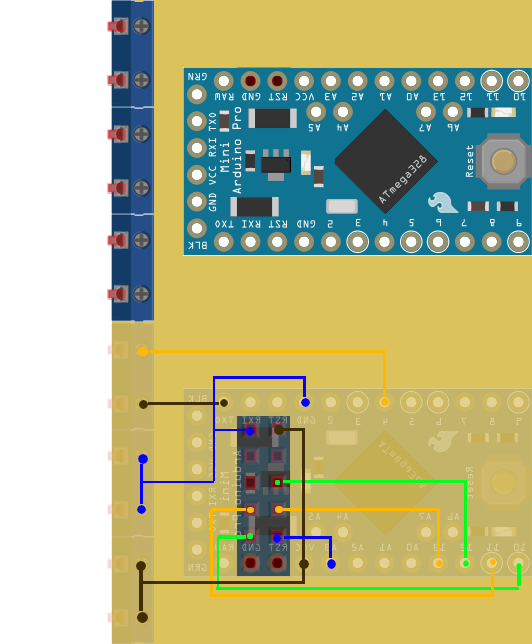
The PCB is just a connector between ENC28J60 and Arduino (AVR)
notes
The cost per led sleeve is between €35,- and €85,- depending on your sources (local/ebay/scrap).
Some important notes:
- the correct winding is top to bottom, clockwise (seen from the top, i.e.: from top right to bottom left)
- I had old Arduino pro minis with old/wrong bootloaders: for these kinds, select Arduino Uno to be able to upload any sketch
- make sure you don't use other diameter pipes (like 75mm drain pipes) or your image will be garbled
- to solder the headers on the solder side, you have to offset them from the PCB (I used scrap plastic from zip ties)
- the power supplies on ebay are very dubious! They are refurbished (sloppy) and given the wire gauge I strongly doubt the were built for 8A continuous use. Don't leave them unattended
- feed the ledstrip from both sides to prevent discoloration
- the Arduino libraries can be a pain to find and/or get working. YMMV.
- for added safety, crimp your stranded wires; it's not worth risking fire for a couple of cents extra
- regarding the firmware[1], make sure to install these specific library versions (and no higher as these are the last working versions for this project):
sleeve++
This version uses a PoE++ injector and a PoE+ splitter to have less cable clutter and make life easier.
It also switches from a cheap Arduino pro mini, ethernet and perf board "glue" to an Arduino Nano clone; the LGT8F328P-LQFP32 MiniEVB, and an ethernet board that fits this footprint. The LEDstrip is 12V this time and the AVR clone came with its own challenges, but nothing major.
notes
- The Ethercard library had to be modified to use the Arduino SPI methods (so SPI initialization is done correctly on the LGT8Fx)
- I fried an ethernet controller by putting 12V on the Arduino Vin pin; the Arduino itself was able to handle it, although it became very hot, so I switched to a buck converter to be on the safe side.
- All LEDS on will draw approximately 1.688A (at 12V)
- Originally, I had a PoE++ 7.5A extractor, but it doesn't fit in the 70mm tube; I was thinking on buying an adaptor but I tried small extractors first:
- LS-POE-1210GK: jumped into protection at 1A
- LS-POE-1210E, the 24-48V version also jumped into protection at 1A
- LS-POE-1210DK: success using approximately 1.5A, but seemed to have some glitches
todo
- share ethercard changes
- moar pictures
